Foil for Nail Art Designs: A Shining Guide
- AmazoniaSilva
- Tháng 1 12, 2025
- Zodiac signs
- 0 Comments
Foil For Nail Art Designs offers a simple yet effective way to add a touch of glamour and sophistication to your manicure. From delicate accents to bold statements, nail foil opens up a world of creative possibilities. This guide will explore everything you need to know about using foil in your nail art, from choosing the right type of foil to mastering application techniques and exploring trendy design ideas.
Understanding Different Types of Nail Foil
Before diving into the world of foil nail art, it’s essential to understand the different types available. Each type offers unique characteristics and application methods, allowing you to achieve various effects.
- Transfer Foil: This is the most common type of nail foil, offering a wide range of colors, patterns, and finishes. It’s applied using a special glue and requires a bit of practice to master.
- Adhesive Foil: This foil comes with a sticky backing, making it easier to apply, especially for beginners. It’s ideal for creating simple designs and accents.
- Crumpled Foil: This type of foil is perfect for creating textured and abstract designs. Simply crumple the foil and apply it to your nails for a unique look.
Knowing the differences between these types will help you choose the right foil for your desired nail art design.
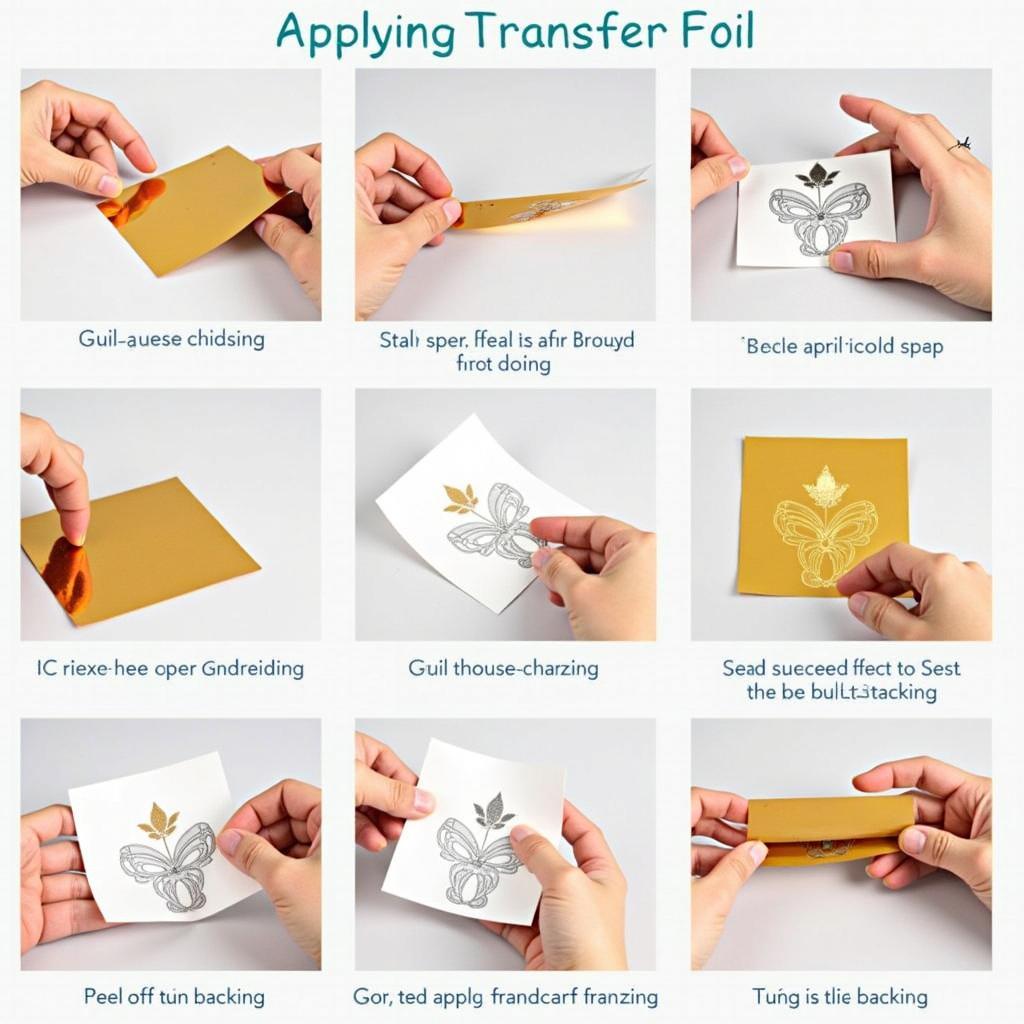
Mastering the Art of Foil Application
Applying nail foil can seem tricky at first, but with a little practice, you can achieve professional-looking results. Here’s a step-by-step guide to help you master the technique:
- Prep your nails: Start with clean, dry nails. Apply a base coat to protect your natural nails and create a smooth surface for the foil to adhere to.
- Apply foil glue: If using transfer foil, apply a thin layer of foil glue to the areas where you want the foil to stick. Allow the glue to become tacky.
- Apply the foil: Gently press the foil onto the tacky glue, ensuring good contact. Smooth it out with your finger or an orangewood stick.
- Peel off the backing: Carefully peel off the backing sheet to reveal the foiled design.
- Seal with a top coat: Apply a top coat to protect the foil and add shine to your manicure. Step-by-Step Application of Transfer Nail Foil
Trendy Foil Nail Art Designs
Foil offers endless possibilities for creating stunning nail art designs. Here are some trendy ideas to inspire your next manicure:
- French Manicure with a Foil Twist: Elevate the classic French manicure by using foil for the tips instead of traditional white polish. Consider nail designs 2024 pink and white for a modern update.
- Geometric Foil Accents: Create geometric patterns using foil and negative space for a chic and minimalist look.
- Foil Marble Effect: Achieve a luxurious marble effect by layering different colored foils and blending them together.
- Abstract Foil Art: Experiment with crumpled foil to create unique and abstract designs. You could even try incorporating light purple dip powder nails for a complementary base.
Tips and Tricks for Perfect Foil Application
- Use tweezers: Tweezers can help you precisely place the foil, especially for intricate designs.
- Work quickly: Foil glue dries relatively fast, so work in small sections to ensure the glue remains tacky.
- Seal the edges: Make sure to seal the edges of the foil with a top coat to prevent lifting and chipping. If you have short nails, you might want to explore pink and white nail designs for short nails for inspiration.
Expert Insights on Foil Nail Art
Sarah Johnson, a renowned nail artist, shares her tips for working with foil: “Foil can be a game-changer for your nail art. Experiment with different colors, textures, and application techniques to discover your unique style. Don’t be afraid to think outside the box!”
Another expert, Emily Carter, adds, “The key to achieving a flawless foil manicure is proper preparation. Ensuring your nails are clean, dry, and properly prepped will make all the difference.”
Conclusion
Foil for nail art designs provides a versatile and exciting way to enhance your manicures. From subtle accents to bold statements, the possibilities are endless. By understanding the different types of foil, mastering the application techniques, and exploring trendy designs, you can create stunning and unique nail art that will turn heads. So, grab your favorite foils and start experimenting! Looking for some holiday sparkle? Check out christmas sparkle nail polish. And for patriotic designs, explore some labor day nail designs.
FAQ
- How long does foil nail art last? With proper application and a good top coat, foil nail art can last as long as a regular manicure, typically 1-2 weeks.
- Can I use foil on natural nails? Yes, you can use foil on natural nails, but it’s essential to apply a base coat first to protect your nails.
- What is the best way to remove foil nail art? Use a regular nail polish remover to remove foil nail art.
- Where can I buy nail foil? Nail foil is readily available at beauty supply stores, online retailers, and some drugstores.
- What tools do I need for foil nail art? You’ll need foil, foil glue (for transfer foil), a base coat, a top coat, an orangewood stick or pusher, and tweezers.
Contact Us
For further assistance, please contact us via Email: [email protected], or visit our office at Fifth Avenue, 34th Floor, New York, NY 10118, USA. Our customer service team is available 24/7.
Related Posts
